A collection of computer systems and programming tips that you may find useful.
 
Brought to you by Craic Computing LLC, a bioinformatics consulting company.

Thursday, December 17, 2009

Creating a Mail Merge from Contacts in Highrise

I've started using Highrise from 37 Signals to manage sales prospects for the SQIP Patent Sequence Database. My requirements for a CRM system are pretty basic. Highrise fits the bill for now, but it's OK - not great.

One glaring problem for me is that I want to create a file of all contacts and their addresses for a physical mailing. In Highrise I record the address for each Company and then just record the company for each Person. When you dump your contacts out as a CSV file 'Person' records do not inherit the address of the linked Company... really, it doesn't...

So I wrote a Ruby script to create what I want from the CSV file. You can find that here: http://gist.github.com/258950

1. Dump your contacts from Highrise
2. Run the script on that file
$ ./merge_highrise_contacts.rb contacts.csv > mail_merge.csv
3. Load the output file into Excel or Numbers (09)
4. Save as a Worksheet
5. Follow the regular Mail Merge instructions for MS Word/Excel or Apple Pages/Numbers

You need the '09 version of Pages/Numbers to do a proper Mail Merge. I prefer Numbers to Excel for this as it handles international characters properly, which I need.

In Numbers you need to designate the Header line as such by selecting 'Convert to Header Row' from the pull down menu on the row 1 label.

I'm all for the 37 Signals 'Keep things simple' approach but there are features that are just too widely used to ignore. Not being able to build a mailing list is one. Not having Prefix and Suffix for Person records is another.

Many of my contacts have doctorates and I want to record the prefix 'Dr.' for those that do. The only way I can do that in Highrise is to include it in the First Name. This is a pain.

Wednesday, December 16, 2009

Screencasting on Mac OS X 10.6 Snow Leopard

I've been making several screencasts as tutorials for our SQIP Patent Sequence Database service.

If, like me, you're not that familiar with video technology and terminology, the process can be confusing - which compression settings? how many frames per second? etc.

With Mac OS X 10.5 (Leopard) you could do simple video editing in Quicktime Player if you upgraded to the Pro version. Ironically in Snow Leopard you can trim video clips in regular Quicktime Player, but without the flexibility and controls of the previous version - and there is no Pro version... so Snow Leopard is a step backwards. The version of iMovie in iLife 09 is great when it comes to editing clips, but is confusing in terms of exporting the finished movie.

Here are the steps that I use to get from my screen to a finished screencast on a hosting service that I can embed in a web page. Its not perfect, but it works for me...

Here are the main steps:
1. Set browser to 1024 x
2. Record screen activity and audio in iShowU
3. Load the movie into iMovie
4. Cut and splice together clips in iMovie
5. Export as MPEG-4 movie (.mp4)
6. Load into QuickTime Player and re-export as a streaming MPEG-4 file (.m4v)
7. Upload to screencast.com

I'm not going into all the details but here are the settings that work for me in each of these components:

1. Set my browser to a defined size (1024 x 768)

Create a bookmarklet with this string: 'javascript:window.resizeTo(1024,768)'

2. Record screen activity and audio in iShowU

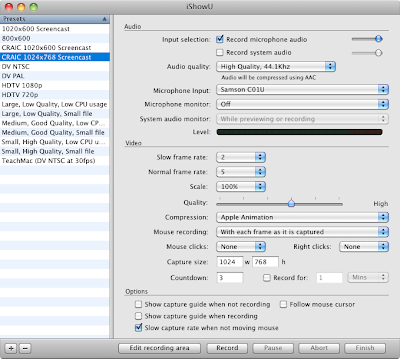
Here are my settings - 'Apple Animation' for compression, capture size and frame rate are the most important.

3. Import in to iMovie09

Go to File -> Import... -> Movies... -> Optimize video: Full - Original Size

Not sure if you need to optimize video - not tried it unchecked. Importing takes a while, probably due to whatever 'optimize' involves.

4. Cut clips from your raw video and add to the new movie.

I'm not going into detail with this - look at the iMovie Docs. I find iMovie to be pretty easy to use once you get the hang of it. I would really like to see real time codes for the start and stop of clips and be able to set those directly, but I guess that is what Final Cut Pro is for.

5. Export as MPEG-4 movie (.mp4)

Here is where it can get tricky... pick the wrong settings and the output looks bad, or it takes *hours* to export, or the output file is huge... or ALL of the above!

I don't have this totally figured out but here is what works for me. Note that I'm going from 1024x768 raw footage to 640x480 output.
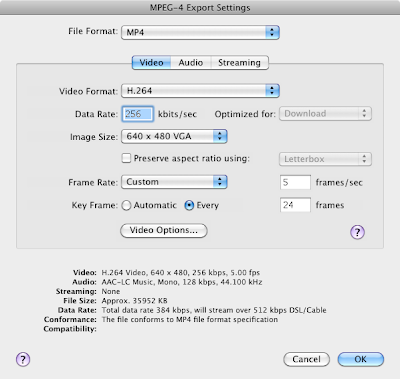

The important settings are:
- MP4 file format
- H.264 video format
- image size (640 x 480 VGA)
- IMPORTANT - frame rate - Custom - 5 frames per second (this is what you recorded the footage at)
- don't worry about the data rate and don't worry about the Streaming tab
- set the audio to mono

In my hands a 12 minute screencast is exported in a few minutes and yields a file around 25 MB.

6. Load into QuickTime Player and re-export as a streaming MPEG-4 file (.m4v)

Without this step, your users have to wait to download the entire file before they can start viewing. You must be able to do this within iMovie but I haven't figured it out yet.

First of all, view your .mp4 movie in Quicktime Player to make sure it works the way you want.

Then go File -> Save for Web... and Export versions for Computer (and iPhone if you want) - then 'Save'.

This will create a folder with several files - all I care about is the .m4v, but view the .html file for links and more info. Open the .m4v file in Quicktime Player to check that it is the same as the .mp4. Compare the files sizes - the .m4v may actually be larger than the .mp4.

7. Upload to screencast.com

I use screencast.com to host my screencasts. You can get a free account, which has been fine for my needs or pay a modest amount and get a much higher bandwidth limit.

It works out pretty well for me, but I do run into odd issues from Firefox on the Mac - things freezing in the admin interface - seems fine from Safari.

Once uploaded to screencast, look under the 'share' icon to get the code needed to embed a flash player in your own web page and try viewing the video. Having converted it to 'streaming' in the previous step you should see the video start pretty much right away while the rest of the data downloads.

If you skip this step then you will be stuck with a black screen for as long as it takes to download - no progress indicator! Not sure if this is a Flash problem or a Screencast one, either way it is not good.

BONUS - Title slides in iMovie

I make title slides in OmniGraffle that are the size of a frame (1024 x 768) and save these as PNG files. You can add these to you iMovie project by dragging and dropping and then changing the length of time they should be visible for.

But a big Gotcha for me, is that by default iMovie will try and apply a silly 'Ken Burns' transition to the slide making it grow (or shrink) slightly. This makes the text look rubbish in my examples.

Click on that 'clip' and use the small 'cog wheel' pull down menu to go to 'Cropping, Ken Burns and Rotation'. Now in the video preview panel (top right), click on the 'Fit' button to make the title slide fit the frame exactly - then click 'Done'

Here is an example of my screencasts embedded in a web page: Creating a New Account in SQIP

Good Luck


Announcing the Launch of the SQIP Patent Sequence Database

Craic is pleased to announce the launch of a web service that we've been working on for the past couple of years.

SQIP (pronounced 'skip') is a database of DNA, RNA and Protein sequences derived from issued patents and published patent applications, along with a sophisticated interface that allows users to load their own sequences, run searches against the database, evaluate matches and then view the patents associated with those matches.

It is targeted not only at biotech patent agents and attorneys, but also at business development and research staff in biotech companies.

SQIP has been built on many of the technologies that this blog has touched on. It has been a lot of work but by leveraging best-in-class software we've been able to build something that we think will change patent sequence searching.

You can sign up for a free account at http://sqipdb.com. You can explore all the features of SQIP, including searches with pre-loaded sequences, at no charge. You simply pay for searches with your own searches - no annual commitment, no per-user charges, no surprises.

Take a look at SQIP.

Friday, December 11, 2009

Ruby and Rails issues on Snow Leopard Upgrade

I had been holding off upgrading my MacBook to Snow Leopard as I figured there would be issues with the Ruby installation and some of the gems. I decided to go for it yesterday... yup, there were issues...

Snow Leopard comes with Ruby 1.8.7 already installed so it is tempting to use that but I follow Dan Benjamin's advice and install my own versions of MySQL, Ruby and Ruby gems in /usr/local. Dan has produced a series of excellent guides on installing Rails, etc on the Mac. HERE and HERE for example. However, his instructions do not always work for me. Here are the steps I needed to do get my setup running on my upgraded laptop.

The main issue is that you want Ruby and MySQL compiled as 64 bit applications. If you have Ruby as 32 bit and MySQL as 64 then things will break with cryptic messages.

I don't like MacPorts and, although I like installing binary packages, I prefer to compile Ruby etc. That way I retain full control on installing new versions.

MySQL:
1. Follow Dan Benjamin's advice on XCode, paths, etc
2. Dump your existing MySQL contents.
3. Download and compile MySQL as per Dan's instructions.
4. Load your data and check that MySQL is working as expected.

Ruby:
1. Don't compile the code as root/sudo - use sudo to run make install and gem install, but nothing else.
2. Make a list of your currently installed gems (gem list --local > gem.list)
3. Download and compile readline-6.0 (http://ftp.gnu.org/gnu/readline/). Supposedly you no longer need to do this, but I found it necessary.
4. Download Ruby into a user writeable directory in /usr/local/src or ~/src
5. Move the existing /usr/local/bin/ruby and /usr/local/lib/ruby (if you have them) - you shouldn't need to but it will make it easier to validate that the new version has been installed
6. Run ./configure with these options
./configure --enable-shared --enable-pthread CFLAGS=-D_XOPEN_SOURCE=1 --with-readline-dir=/usr/local
7. Follow with make, sudo make install
8. Check that you now have /usr/local/bin/ruby and check that it is compiled as as 64 bit by running 'file /usr/local/bin/ruby'. You should see '/usr/local/bin/ruby: Mach-O 64-bit executable x86_64'.
9. Now download and install rubygems as per Dan Benjamin.
10. Any gems that have C extensions need to be recompiled, but to be safe you should install all of them (You could copy them from your old installation but don't). I have a script for doing this which I should post.
11. The MySQL gem is different - you want to pass the path of the mysql dir to the gem install, like this:
sudo gem install mysql -- --with-mysql-dir=/usr/local/mysql
Note that you should not need to specify ARCH_FLAGS or anything else, which is recommended elsewhere - not needed.
12. Install Phusion Passenger if you are using that.
13. Check out your Rails apps. Use 'script/console' and try some simple finds on your models.

If you see this: NameError (uninitialized constant MysqlCompat::MysqlRes) it is most likely that your Ruby and/or gems are not compiled as 64 bit. You will see all sorts of posts where people have seen that error. I think most of them are the result of this mismatch.

To check any executable/library just do 'file ' and see if it says 32-bit or 64-bit.


Wednesday, November 11, 2009

Source Code for Mozilla Jetpack Features

Mozilla Labs have released Jetpack, an environment for writing Firefox extensions using JavaScript. It looks pretty neat and I'm interested in trying writing one myself.

The best way to learn a new environment is to look at working examples and you can find a growing number of these in the Jetpack Gallery.

You just install Jetpack and then install the 'Features' that interest you and try them out.

But where is the source code? It's not under the Tools menu and you can't do something simple like right-click the Feature icon in your status bar.

1: Enter 'about:jetpack' in the URL box
2: This brings up a page with links to various things including a tutorial and the API reference.
3: Click on 'Installed Features' to see a list of everything you have installed.
4: Click on 'view source' next to each Feature to bring up the JavaScript source in a new window.

I'm not a fan of too many browser extensions but some of them like Firebug, YSlow and S3Fox are invaluable. Jetpack will make it easier for folks like me to contribute new extensions.

Of course this only applies to the Firefox browser...

Thursday, October 15, 2009

Remote Desktop Software

In the past I've used VNC as a remote desktop solution for viewing, say, a Linux desktop on a remote Mac, but I've now switched to NoMachine NX.

VNC is widespread and I think most Linuxes come with it already installed. But when I tried to use it recently with a Fedora VNC server and Mac OS X VNC client (Chicken of the VNC) I was seeing performance that made it unusable.

I think the problem stems from a variant of the VNC protocol or software called TightVNC and I believe the default Linux implementation uses this. Running a Tight VNC client on a Windows machine gave reasonable performance and doing the same on Mac OSX might solve the problem.

Instead I decided to check out NoMachine NX, which I had heard about in the past. This is commercial software but there are free versions of the server and client available for all the main platforms.

Installing the server (on Fedora) involves downloading RPMS for the client, node and server (you need all 3) and installing them:

# sudo rpm -i nxclient-3.4.0-5.x86_64.rpm
# sudo rpm -i nxnode-3.4.0-6.x86_64.rpm
# sudo rpm -i nxserver-3.4.0-8.x86_64.rpm

It installs into /usr/NX by default and you start/stop the server with
# /usr/NX/bin/nxserver --status|--start|--stop|--restart

You don't need to bother with any other NX options right now. At least, not if you are accessing machines in a private network. You may need to tweak your Fedora to allow the remote client to access your desktop (I didn't have to).

On the client end (Mac OS X in my case), download and install then fire up the application. It will give you a 'Connection Wizard' which is self explanatory.

The session will open up an X window on your Mac and I find the performance (on a local network) to be more than adequate. With remote desktops there can be issues with the 'scope' of keystrokes - for example you can't Cmd-C some text in the Mac world and expect to Cmd-V it into a Linux app - that sort of thing.

So if you want an open source solution then play around with VNC, otherwise go with NoMachine NX.

Wednesday, October 14, 2009

Fixing Broken Macs

If and when you need to resuscitate a Mac that won't boot up all the way, there are some commands that will save you a lot of time.

If your problem is not a true hardware issue then chances are there are disk errors and so the first task is to check and repair the disks. You can boot off an install CD/DVD or one with repair tools on it, but if you are comfortable with booting UNIX machines then skip that and...

Boot in Single User Mode

Hold down Command-S when you turn the machine on. You should get a gray screen which will quickly turn into a classic UNIX console with all sorts of cryptic text. At the bottom of which should be some instructions to either check the disks or to reboot in 'full' Single User Mode.

Disk repair with fsck

Your first step should be to run fsck, the UNIX disk checking program, with the options -fy. The 'f' forces fsck to check all available filesystems and 'y' answers Yes whenever it would ask you to approve a fix. If you skip the 'y' then you'll be sat there for hours responding to prompts.

# fsck -fy

That will likely produce lots of scary messages about different files. Don't sweat the details, just let fsck do its thing. Any files that it breaks were already broken by the underlying disk issue. fsck won't compound the damage, only repair most or all of it.

When it finishes, run it again! There can be dependency issues with disk fixes so to play it safe just run it multiple times until it reports no new errors. Typically the first run will get them all.

If you want to poke around on the filesystem then you can mount it with:
# mount -uw /

Reboot the System

If you are feeling lucky then just type 'reboot' at the prompt to see if your system comes back all the way. Fingers crossed...

If it doesn't then just restart the machine with Command-S as before and get back to Single User Mode.

'Full' Single User Mode

At this point you are in Single User Mode but with only the basic services. You can start up a bunch more stuff with

# sh /etc/rc.d

You'll see a bunch more verbage on the console. Keep an eye on it to see if any services are not able to start up - important clues to your problem. You'll either get a system prompt or an error. Hit return to get the prompt if you don't see one.

Now you have access to pretty much all the command line programs, man pages etc. an you are free to do untold damage to your system...

diskutil

One useful program to know about is diskutil, which is the Mac tool for messing with disks. Look at the man page for details.

To see what disks the system knows about:
# diskutil list

To eject a CD/DVD in the drive (your device name may be different)
# diskutil eject /dev/disk1

Zapping the PRAM

You'll see mention about zapping the PRAM memory in the machine by starting it up while holding down Option + Command + P + R (don't worry about Shift for the P and R). Hold them until your hear two chimes.

This is easy to do - and has never had any effect on any system that I've played with...

Booting from a CD/DVD

To force a boot from a CD with recovery tools on it, turn the machine on, pop the disk in and hold down the C key. You should get to a gray screen with the spinning indicator. Let go of the C key and you should get an OS install menu, or whatever you have on your CD.

If a simple disk repair doesn't fix the issue then you may need to reinstall the OS from disk. Not a problem but be sure to select 'Archive and Install' in order to keep your existing files. Some might say just go for a reinstall regardless of the problem - but I would strongly suggest doing a disk repair first.

Good luck with your fix.

Tuesday, October 13, 2009

Rails Production Environments

Two things that I always forget when working with a Rails app in production mode - without them you get the development environment.

Migrations:
$ rake db:migrate RAILS_ENV=production

Console
$ script/console production

Tuesday, September 15, 2009

SHA1 Digest of an Empty String

The use of SHA1 digests of data as unique identifiers is the answer to everything.

I know that appears to be ridiculous hyperbole, but I'll go into why I think that is the case in a longer post at some point. For now you'll have to take my word for it that using them as identifiers has simplified the inner workings of a big project tremendously. It's not just me either, the Software revision control system Git uses them as IDs for all its commits.

Anyway... one issue that can arise with them is that you notice that one specific digest string occurs more frequently than others in this uniformly distributed hash space... yikes... what's going on?

That digest would be da39a3ee5e6b4b0d3255bfef95601890afd80709 - make a note of it!

It represents the SHA1 digest of an Empty String

You might want to consider adding an explicit test for that string somewhere in your code.

Ideally you want a direct test for an empty string being used as an ID, but checking for this digest is a useful catch-all test.

Once I realized that this digest was being generated, and realized what it represented, then I could focus in on the root cause very quickly.

Wednesday, August 19, 2009

Capistrano and Environment Variables

When it works well, Capistrano is a great way to deploy Rails applications and take care of any remote server operations that are needed for that app.

But if you run into problems it can be a bear to troubleshoot. And the documentation is not great.

One issue that can catch you (or me!) unawares is the 'run' command that runs a Unix command on the remote host. I use these to symlink various files and to start up a daemon on the new deployment once that is complete.

You run into a problem if any of your remote commands require access to your Unix Environment Variables. The 'run' command is executed in a minimal environment without any of these.

The solution is to specify the variables that you need, such as PATH, as key/value pairs in the 'default_environment' hash in your cap deploy.rb file.

For example, here are two variables defined near the top of my file:
default_environment['AMAZON_ACCESS_KEY_ID'] = "YourAwsKeyHere"
default_environment['AMAZON_SECRET_ACCESS_KEY'] = "YourSecretAccessKeyHere"

Easy enough, once you know... not at all easy if you don't know!


Lightbox2 in a Rails App

Lightbox2, by Lokesh Dhakar, is an excellent JavaScript script for displaying images and slide shows as overlays on a web page, triggered by clicking on a thumbnail.

I wanted something like this to display screenshots in the online help for a Rails application. Overall it was pretty simple to set up, but here are some of the tweaks I needed to make.

1: Lightbox2 uses prototype.js and Scriptaculous. I had those in my Rails app but I found I had to upgrade those scripts to the latest versions in order to get Lightbox2 to work.

2: I had included the prototype and scriptaculous libraries using the Rails helper 'javascript_include_tag :defaults', but that alone is not sufficient. Lightbox2 needs the builder and effects scripts loaded. Lightbox2 says to use this line:
<script type="text/javascript" src="/javascripts/scriptaculous.js?load=effects,builder"></script>
And I put that right after the javascript_include_tag. This is undoubtedly duplication... I should probably just include the supporting scripts directly and leave out the Rails helper.

3: As the Lightbox2 docs point out, make sure you have the four default gif image files in the right places and that they are defined correctly in lightbox.js and lightbox.css.

4: Add the calls to lightbox.js and lightbox.css in your Rails layout file. Note that you have to change the paths from the example to suit Rails:
<script type="text/javascript" src="/javascripts/lightbox.js"></script>
<link rel="stylesheet" href="/stylesheets/lightbox.css" type="text/css" media="screen" />

5: Now you're ready to add images and links that use Lightbox2. The idea is very simple. Take a thumbnail image img tag and place within a 'a' tag pair. Make the href of the 'a' tag point to the full size image. Importantly, in the 'a' tag add the attribute 'rel="lightbox"'. For example:
<a href="/images/fullsize.jpg" rel="lightbox" title="Picture of a cat"><img src="/images/thumbnail.jpg" style="border: 1px solid #808080;"></a>
The title attribute of the 'a' tag becomes the caption of the overlay image. In this example I have included a border on the thumbnail image. That should do it for basic operation.

6: To fine tune the script you can edit lightbox.js and lightbox.css. For me the animation is too slow. You can disable the animation entirely but I preferred to just speed it up with a maximum setting of 10. I also messed with the CSS for the 'imageData' set of CSS IDs to change the font and specified a different image for the 'close' icon in the .js file.

Lightbox2 is pretty slick. You can do slide shows with it as well. Hope this helps you get it integrated with Rails.


Monday, August 17, 2009

Configuring SSL on an AWS EC2 instance - Security Groups

If you are trying to set up SSL with Apache (or any other server) on an AWS EC2 instance then before you do anything else, add port 443 to your Security Group.

Until you do that absolutely NOTHING will work!

You typically set up a Security Group when you create your EC2 account and then forget about them - I know I did...

You can see what ports you have open with this command:
$ ec2-describe-group
And you open up Port 443 with this command ('default' is the name of my security group):
$ ec2-authorize -p 443 default

I hope to write more on troubleshooting SSL set ups shortly.


Wednesday, August 12, 2009

AWS EBS Volumes and Snapshots

AWS Elastic Block Store Volumes are invaluable for setting up EC2 nodes.

You can clone and/or backup Volumes into static Snapshots, also extremely useful. But be aware that the process of creating a Snapshot can be extremely slow and this can be a major problem if you are not expecting the delay.

For example, creating a snapshot from a 50GB volume took almost 2 hours for me today. Now, times will vary for all sorts of reasons. Most importantly, the first time you create a snapshot off a given volume will take the longest. Subsequent snapshots are just recording the changes since the previous one.

Being prevented from using your Volume for an extended period of time can be a huge problem, so plan ahead and make your snapshots overnight, for example.

Having said that, if your Volume contains Static or Read-Only data, then you have more flexibility:
- You can create a Snapshot from a mounted Volume, without having unmount or detach
- You can mount an unmounted Volume that is in the process of Snapshot creation.

This is convenient and does not appear to be explicit in the AWS docs, as far as I can see.
But this is limited to Volumes that will not change during snapshot creation.

WARNING: DO NOT try this with a Volume that is being written to, such as one holding a database.


Tuesday, August 11, 2009

UNIX screen command

I have a mental block when it comes to the UNIX command 'screen' so this is a short reminder for me.

In a UNIX shell run 'screen' to create a new session. In this you might want to run a long job.

To exit from a screen session, destroying that session in the process, type 'exit'.

To detach from the session, leaving it running, type 'Ctrl-a d'

To return to a running 'screen' session from a top level shell, type 'screen -x'. This will list all running sessions and identify each with a PID number.

To return to a specific session, when you only have one running, type 'screen -r'.

To return to a session when more than one are running add the PID to the command, e.g. 'screen -r 123'.


Creating and Attaching AWS EBS Volumes to an EC2 node

AWS Elastic Block Store (EBS) Volumes are arbitrary blocks of storage that can be mounted on EC2 nodes and used like regular filesystems. Here are the basic steps needed to set them up (and the associated gotchas to avoid).

1. Create a new EBS Volume using the AWS Management Console.
Know what size in GiB you want in advance and make sure you create it in the same Availability Zone as the EC2 node you want to attach it to.

2. Attach it to your EC2 instance
Do this from the Management Console. If you have more than one EC2 node running make sure you know the Instance ID, PLUS know which device you want to attach the Volume to. Your options are typically /dev/sdf, /dev/sdg, etc. Not sure what happens if you try to attach to a device that is already in use. It probably won't let you but I would rather just not go there...

Wait until the Console tells you the Volume is 'attached'. You might want to refresh the console to see this.

Now go to the EC2 node...

3. Create a Filesystem on the Volume
If (and ONLY if) this is a NEW Volume then you need to create a filesystem on it before you can do anything. Skip this step if the Volume has previously been mounted.

You can create different types of filesystem on the Volume. On linux the current recommended type is ext3. Here I am using /dev/sdh. Note that it asks if I want to use the entire device - Yes I do!
# mkfs -t ext3 /dev/sdh
mke2fs 1.40.4 (31-Dec-2007)
/dev/sdh is entire device, not just one partition!
Proceed anyway? (y,n) y
[...]
4. Create a mount point for the filesystem
Again, you may not need to do this if the EC2 node has previously mounted this Volume, but for a new setup you want to create a mount point under /mnt for the volume. For example:
# mkdir /mnt/myvolume
And then proceed to mount the Volume:
# mount /dev/sdh /mnt/myvolume
There should be no output from this command. Check that it is mounted with 'df' and then just 'cd' to it and start using the space.

5: To detach your Volume
First you need to un-mount it from your EC2 node while the node is running.
# umount /mnt/myvolume
Then you can detach it using the Management Console (and remember to Detach, not Delete!)
Only then should you shutdown your EC2 node, if you choose to do that.

6: Creating Snapshots of Volumes
You can create Snapshots of your Volume as backups or as a copy from which to clone other Volumes to attach to other nodes. (A given Volume can only be attached to one node at a time).
You can do this from the Management Console. You should do this on Volumes that are not attached to EC2 nodes so as to avoid anything being written to the Volume during Snapshot creation. You should do that but you can create a snapshot from a mounted Volume if you want to. How risky this is depends on what you are doing - never do this if it the Volume carries a live database, but it is OK if the Volume has a read-only dataset on it. Caveat emptor.

In their web pages, AWS talks about an EBS volume having higher performance than local disk. The impression I get from other blogs is that this is very variable and depends on what you use the disk for. I have not formed an opinion for my applications as yet.


Sinatra and Passenger

It is easy to run a Sinatra application under the Phusion Passenger and Apache web server, but the configuration is not especially explicit.

I am assuming that you have Passenger already installed.

1: Set up your Sinatra application and test it on localhost - try something very simple for the purposes of getting it running under Passenger.

2: Create a file called config.ru in the same directory as the Sinatra app containing something like this, where 'yourapp' refers to your application in 'yourapp.rb'
require 'yourapp'
set :environment, :production
run Sinatra::Application
I find the choice of the file name config.ru confusing, but there you go.

3: Create a 'public' directory in the directory with your app, as well as 'tmp' and 'log' directories. They can be empty for a simple application - but you need 'public'
# mkdir public
# mkdir tmp
# mkdir log

4: Edit your apache2.conf (or httpd.conf) file

You may need to add a PassengerDefaultUser line right after your other Passenger lines.
PassengerDefaultUser root
And then you want a Virtual host block for the Sinatra service that looks something like this:
<VirtualHost *:80>
DocumentRoot /yourdir/public
ErrorLog /yourdir/log/sinatra_error_log
CustomLog /yourdir/log/sinatra_access_log common
<Directory /yourdir/public>
Options FollowSymLinks
AllowOverride None
Order allow,deny
Allow from all
</Directory>
</VirtualHost>

You might want to 'touch' the two log files in your app log directory so they exist before apache wants to use them. In the past, at least, not having the log files in place would cause Apache to complain.

5. Restart Apache
This is a full restart
# /etc/init.d/apache2 restart
For changes to your application just use the standard Passenger reload by touching the file restart.txt in your tmp directory
# touch /yourdir/tmp/restsrt.txt

It is the presence of the empty public directory below your Sinatra app directory that tells Passenger that you have an app there. Notice that you are not telling it explicitly that you have a Sinatra app in the Apache conf file. Passenger looks one level up from this directory, sees the config.ru file and executes that.

Rather cryptic for my taste - but admittedly simple once you know how - and now you do...


Friday, August 7, 2009

Rename a MySQL database used in a Rails Application

The safe and simple way to rename an existing database is to dump it out as SQL, create a new database with the new name and then load it back in.
$ mysqldump -u root -p -v old_db > old_db.sql
$ mysqladmin -u root -p create new_db
$ mysql -u root -p new_db < old_db.sql
If the database is the back end to a Rails app then you also need to update your config/database.yml file to use the new name and restart the web server, or nudge Passenger.

Test out the new DB, test it again, and then some more before destroying the old database.
$ mysqladmin -u root -p drop old_db


Tuesday, August 4, 2009

RedCloth 4.2.2 and textilize in Rails 2.2

I found incorrect instructions on how to set up the RedCloth Textile rendering code in several places when I was trying to set it up.

Here is what needed to get it working (I am using Rails 2.2 on Mac OS X)

1: Install the gem
Just get it from a default gem repository and make sure you use 'RedCloth' and not 'redcloth'.
$ sudo gem install RedCloth
2: In your Rails app environment.rb file add two lines.
First specify this dependency with any others in the Rails::Initializer.run block. Don't worry about specifying a version.
  config.gem "RedCloth"
Second, add this require line at the end of the file:
require 'RedCloth'
3: Get rid of any earlier versions of RedCloth.
You may not need this but I ran into issues with Rails picking up v4.0.1 even though the newer 4.2.2 was present.
$ sudo gem uninstall RedCloth --version <your older version>
4: Restart your web server.
I run Apache2 and Passenger and simply doing 'touch tmp/restart.txt' did not solve my earlier version problem. Probably overkill but restart the server anyway.

5: That's it...


Friday, July 31, 2009

Apache CGI scripts in arbitrary directories

In order to allow the execution of CGI scripts by Apache in an arbitrary directory you need to do two things. It's real easy but I forget the details every once in a while.

1: In the <Directory> block you need to add the ExecCGI option, to allow execution of scripts
2: Plus you need to add the AddHandler line, which defines which file extensions represent executable scripts
<Directory /var/www/>
AddHandler cgi-script .cgi
Options ExecCGI Indexes FollowSymLinks MultiViews
AllowOverride None
Order allow,deny
allow from all
</Directory>
And then restart the server.

Note that you want ExecCGI and NOT +ExecCGI - not really sure why the plus option doesn't work, but it doesn't.


Wednesday, July 29, 2009

Environment Variables, Rails 2.2.2 and Passenger 2.2.4

I want to pass an environment variable into my Rails app which represents the root of the server name that it will respond to (e.g. 'craic.com'). Note that this is not the default hostname of the machine. And I want to set this when I run the app on my laptop and when I deploy it to an EC2 node.

I'm running the app under Apache2 and Phusion Passenger.

Setting a UNIX shell environment variable in .bashrc, etc., doesn't work because the files are not sourced from Apache.

The way to do this is to set them within your Apache Virtual Host block using the SetEnv directive. For example, here is a vhost block for my app:
<VirtualHost *:80>
ServerName www.example.com

SetEnv FOOBAR "foobar"

DocumentRoot "/mnt/myapp/current/public"
RailsEnv development
RailsAllowModRewrite off
<directory "/mnt/myapp/current/public">
Order allow,deny
Allow from all
</directory>
</VirtualHost>
Then in your application, typically in your config/environment.rb file, you would access this as:
my_variable = ENV['FOOBAR']

This works great but ONLY with version 2.2.3 or higher of the Passenger Gem. To see what version you have installed:
$ gem list passenger
and to update:
$ sudo gem update passenger
$ sudo passenger-install-apache2-module


Tuesday, July 28, 2009

Rails, Git, Capistrano, EC2 and SSH

I wrote a post last year on configuring SSH to communicate with an EC2 via Capistrano. Here is a followup post that shows how to deploy a Rails app from your local machine to an EC2 node.

I'm skipping the database used in the Rails app and all the application start/restart/stop details that might involve Apache and Passenger. The focus is on getting the code copied over to EC2.

Here are the prerequisites:
1: An EC2 instance with all the necessary packages and Ruby gems needed for your app to run. That's a big topic in itself - but not for this post.
2: A client machine with Rails, git, and capistrano installed (In my case this is all on a Mac OS X 10.5 system, Rails 2.2.2, etc.)
3: A SSH key pair (see my previous post) - Note that this is NOT the same as your EC2 keypair (which you need as well)

I suggest you try creating an deploying a test app like this one before you try to deploy a real app.

1: Create a new Rails app - we'll call is 'deploytest'
$ rails deploytest
$ cd deploytest

2: Create a local Git repository for it
$ git init
$ git add *
$ git commit -a -m 'initial commit'
$ git status

3: Create a couple of Capistrano files
$ capify .

4: Edit config/deploy.rb
# The name of your app
set :application, "deploytest"
# The directory on the EC2 node that will be deployed to
set :deploy_to, "/mnt/#{application}"
# The type of Source Code Management system you are using
set :scm, :git
# The location of the LOCAL repository relative to the current app
set :repository, "."
# The way in which files will be transferred from repository to remote host
# If you were using a hosted github repository this would be slightly different
set :deploy_via, :copy

# The address of the remote host on EC2 (the Public DNS address)
set :location, "ec2-174-100-100-100.compute-1.amazonaws.com"
# setup some Capistrano roles
role :app, location
role :web, location
role :db, location, :primary => true

# Set up SSH so it can connect to the EC2 node - assumes your SSH key is in ~/.ssh/id_rsa
set :user, "root"
ssh_options[:keys] = [File.join(ENV["HOME"], ".ssh", "id_rsa")]
The only account on a default EC2 instance is root. You probably want to create a second user that is responsible for your application.

5: Copy your SSH public key to your EC2 node
$ scp -i ~/my-ec2-keypair ~/.ssh/id_rsa.pub root@ec2-174-100-100-100.compute-1.amazonaws.com:/root/.ssh/authorized_keys2
NOTE the filename authorized_keys2 - not authorized_keys!!

6: Setup the EC2 node for Capistrano deployment.
From your LOCAL machine, not the EC2 node:
$ cap deploy:setup

7: Finally, deploy your application
$ cap deploy
You will see lots of output and with this dummy application some of those will report errors/warnings. Don't worry about that for now.

8: Check that the Deployment was successful
Connect to the EC2 node with SSH the regular way, cd to the app directory and check that everything is there. If that is all working then you are ready to deploy a real application and add custom tasks for managing the database, restarting the server etc.

Bear in mind that Capistrano add new 'releases' of your software in separate directories and symlinks the 'current' directory to the latest. So the root of your deployed application is the 'current' subdirectory.


Good luck.


Friday, July 10, 2009

JAVA_HOME Environment variable in Ubuntu

If you want to use Java you need to set the JAVA_HOME environment variable in your .bashrc. The installer won't do it for you. But knowing what to set it to seems to vary widely between distributions.

On Ubuntu 9.04 jaunty I set mine to this:
export JAVA_HOME=/usr/lib/jvm/java-6-openjdk
Note that I did note explicity install java, instead it was a dependency of apt-get install ec2-api-tools, so other installation paths may use a different JDK.


Thursday, July 9, 2009

Simple Example of Customizing AWS EC2 Instances at Launch

With Amazon Web Services EC2, you fire up a new Instance (compute node) from a given AMI (machine image) and you can build custom AMIs to suit your specific needs. But there are many things that you only want to specify when you fire up your instance. And in my case there is always some stupid detail that I forgot to specify when I built the AMI.

So having a way to customize the instance at launch time is important.

One guide to doing this is by PJ Cabrera on the AWS site. This is great but it is relatively complex for many needs. Here is a simpler tutorial on the steps needed for basic customizations:

I'm using one of the EC2-tailored Ubuntu AMIs as my base. Eric Hammond provides a valuable service to the EC2 community maintaining these. Specifically I'm using an Amazon EC2 Ubuntu 9.04 jaunty AMI that I've added lots of custom packages to.

In /etc/init.d you'll find several init scripts that start with 'ec2-'. ec2-run-user-data is the one that matters here, written by Eric Hammond. This will run automatically on start up and look for a user-supplied script at the URL http://169.254.169.254/2008-02-01/user-data. This is not a generally accessible URL and has a special role in EC2.

If ec2-run-user-data finds a file at this URL that begins with the characters '#!' it assumes that this is an executable script and executes it. You can create this script and have it set environment variables, run other scripts, etc.

This custom script actually comes from your desktop machine and you specify it when you start up a new EC2 instance. Somehow in the innards of EC2 the file is uploaded and is made available to your instance only via this special URL.

Here is how I fire up a new instance from my desktop:
$ ec2-run-instances -k mykeypair -f ec2_custom_script.sh -t c1.medium -z us-east-1a ami-12345678
You specify your file after the -f flag and it needs to be an executable script file. Bash, Perl, Ruby, etc. should all be fine as long as your AMI has that interpreter installed.

So what goes into a launch script? One common use is to set up your AMAZON_SECRET_ACCESS_KEY and AWS_ACCESS_KEY_ID keys that you need for accessing S3, etc. You don't want to hard wire these into your AMI, but you do need these to be available when you login to an instance. So in my launch script I add these to my .bashrc file which is loaded when I actually login. I also create a couple of custom mount points this way where I can mount EBS volumes.

Here is a simple launch script:
#!/bin/bash
# Simple custom EC2 launch script
mkdir /mnt/craic
mkdir /mnt/data
BASHRCFILE=/root/.bashrc
AMAZON_SECRET_ACCESS_KEY=<yourkeygoeshere>
AWS_ACCESS_KEY_ID=<yourkeygoeshere>
echo "export AMAZON_SECRET_ACCESS_KEY=${AMAZON_SECRET_ACCESS_KEY}" >> ${BASHRCFILE}
echo "export AMAZON_ACCESS_KEY_ID=${AWS_ACCESS_KEY_ID}" >> ${BASHRCFILE}
# Need this for Rails on Ubuntu
echo "export PATH=/var/lib/gems/1.8/bin:$PATH" >> ${BASHRCFILE}
The great thing about Eric's ec2-run-user-data script is that it is all set up and ready to go. Pass it a valid script and it should just work.

Note that there is a limit of 16kb the size of launch files using this mechanism. That is quite a lot for a script but you still want to be frugal. If you need more than this then put additional steps into one or more secondary scripts and have your primary launch script fetch these from S3 and execute them.

Also note that you cannot specify a file when you launch an instance using the AWS Management Console. You should be able to cut and paste in the contents of your script into the user-data field in the advanced options, but this is an ugly way to do it. You may be best off to use the command line ec2-run-instances command as shown above. I'm not sure if other interfaces like ElasticFox can handle this.

You can get fancy by rolling your own /etc/init.d scripts and passing a compressed zip file, etc., to it via this mechanism. But I've found that a pain in the neck to troubleshoot when I've had issues. As long as you are using Ubuntu the simple approach is the way to go.


Installing Rails on Ubuntu - Path Problem

There is an annoying issue when installing recent versions of Rails on Ubuntu (and possibly other Linux variants).

You install the necessary gems but when you try to run rails you get this:
# rails -v
The program 'rails' is currently not installed. You can install it by typing:
apt-get install rails
-bash: rails: command not found
You can see that the gem is installed:
# gem list rails
*** LOCAL GEMS ***
rails (2.3.2, 2.2.2)
So where is it? Turns out you need to add this link to your PATH variable (in your .bashrc file for example):
# export PATH=/var/lib/gems/1.8/bin:$PATH
That does the trick:
# rails -v
Rails 2.3.2
You will find mention of this on page 25 of the 3rd Edition of 'Agile Web Development with Rails' but it needs to be more widely known. Gotchas like this that just prevent you from doing anything with a piece of software are BAD NEWS - someone make it go away...


Monday, July 6, 2009

Passing Arguments to Rake with a Rails application

In order to pass arguments to a Rake task you specify them as named arguments in the task definition and then pass the actual values in square brackets following the rake task on the command line.

Here is a simple example:
task :mytask, [:word0, :word1] do |t, args|
puts "You typed: '#{args.word0}' and '#{args.word1}'"
end

You run this from the command line thus:
$ rake mytask[hello,world]
You typed: 'hello' and 'world'

Interacting with a Rails app involves adding a dependency of :environment. Add this after the array of arguments like this:
task :mytask, [:word0, :word1] => :environment do |t, args|
puts "You typed: '#{args.word0}' and '#{args.word1}'"
end
The syntax looks weird but it works.


Friday, June 19, 2009

Sending Email from a Linux machine

Sending a notification email from a server to a remote address is a very common requirement. If all you want to do is send email and not receive any (from local or remote sources) then installing good old sendmail is overkill.

A simple alternative is to install ssmtp. On ubuntu:
$ sudo aptitude install ssmtp
and then edit /etc/ssmtp/ssmtp.conf. Here is an example configuration that uses a Gmail account for relaying:
#
# Config file for sSMTP sendmail
mailhub=smtp.gmail.com:587
AuthUser=youraccount@example.com
AuthPass=yourpassword
UseSTARTTLS=YES
# The full hostname of this machine
hostname=yourhost.example.com
# Allow users to set their own From: address?
FromLineOverride=YES

You send mail using /usr/sbin/ssmtp just as you would with sendmail, but without any of the sendmail.cf configuration business.

As a bonus, ssmtp sets up symlinks for /usr/lib/sendmail and /usr/sbin/sendmail such that if you have an existing script that calls sendmail it will probably work as is one a system with ssmtp installed.

Here is a ssmtp man page.


Thursday, June 18, 2009

Erasing Disks on Linux Machines

I'm decommissioning a couple of Linux boxes and want to erase the disks before passing them on to a recycler. There are a couple of favored options:
1: Boot from a Knoppix LiveCD and use the 'shred' utility
2: Use DBAN - Darik's Boot and Nuke

Using Knoppix ought to give you more control over the process but I found it to be less than ideal. This is how you would use it:
1: Boot the machine from a burned copy of the Live CD
2: Open a console in the desktop that appears
3: Run shred with suitable parameters on each partition on your machine, e.g.:
# shred -n 10 -z -v /dev/hdb
This would run 10 rounds of writing random date to the specified disk (-n 10), followed by one round of writing zeroes (-z).

The problem I had was that I didn't remember the disk ids on that machine. Normally you could just run 'fdisk -l' and see what was there... BUT the Knoppix version of fdisk doesn't give you that - dang it - so I had to reboot the machine under its own linux and see what was there. That was annoying - must be another way to do that but I don't know it.

DBAN does what it says on the tin. It boots a machine and then nukes the contents of every disk it can find. It is designed for disk erasing and gives you various degrees of erasure, including the Dept. of Defense standards.

1: Boot your machine with a CD version of the DBAN iso (only 2MB!)
2: Look at the options or just type 'autonuke' at the boot prompt (this gives you the default 'DoD short' level of erasing.
3: Go away and do something else - it takes ages (as in an hour or more)
4: Done...

One thing to note - the current version (as of June 2009) is 1.0.7 - the DBAN site mentions that for Core 2 Duo processors you need version 2 which is a pre-release at this stage.


Wednesday, June 17, 2009

Removing a Linux machine from LDAP

You'll find loads of guides to setting up LDAP authentication, etc. on a network and loads of information about Linux and LDAP. But I want to convert a Linux node that gets its users from a LDAP server into a standalone system with one or two local users and no NFS mounted filesystems. I can't find any information on how to do that. So here is what I came up with...

I have a 'mature' Linux system probably pushing 9 years old (Red Hat 7.3). It gets its user accounts from another Linux system set up as a LDAP server. At the moment I'm trying to simplify my network and as I'm the only user I really don't need LDAP (it is convenient but the systems overhead is not worth it right now.)

The LDAP server handles the user accounts, passwords and the mounting of user home directories via NFS from a third server. I just want one user account on the client with a local home directory.

Before making any changes I can log into the client as 'jones' and get all my home directory files mounted via NFS. If I look in /etc/passwd there is no line for 'jones', but there is one for local user 'root'.

1: Edit /etc/nsswitch.conf (you need to be root) and remove the ldap option from the following lines.
passwd:     files nisplus ldap
shadow: files nisplus ldap
group: files nisplus ldap
So your line will look like this:
passwd:     files nisplus
shadow: files nisplus
group: files nisplus
These options define the search order for each item. So for a password the order is the password file on the local machine (files), nisplus (if that is still used these days?) and finally LDAP. Removing the 'ldap' option means that if the system can't find the requested user in the local password file it will give up.

2: You also need to rename /etc/ldap.conf to something else
# mv /etc/ldap.conf /etc/ldap.conf.bak

3: Reboot the machine.

Now try logging in as root (root should always be a local user). Now try changing to a user account that was previously valid (e.g. jones in my case). The user should be unknown as we've broken the connection to the LDAP server.

To recreate that user on this client machine do the regular steps:
# /usr/sbin/adduser jones
# passwd jones
Now if I look in /etc/passwd there is a line for 'jones' and I can 'cd' to /home/jones, where I will find an empty directory.

That seems to be all there is to it. There are probably other lines in /etc/nsswitch.conf with 'ldap' in them. Try removing the ldap options, rebooting and verifying that everything still works the way you expect.

You might also want to check /etc/fstab, /etc/auto.master and /etc/auto.misc to make sure you're not mounting any other filesystems from remote machines.

At this point your system should be completely standalone (perhaps save for DHCP). Try unplugging the network cable, rebooting and verifying that it functions as expected.


Finding the Address of your DHCP Server

Firewalls and routers are often configured as DHCP servers by default. That can cause issues if you already have a server on your internal network. How do tell which DHCP server any given client is using?

Mac OS X:
$ ipconfig getpacket en0
Where en0 is your Ethernet interface (you might want en1 if you are using a wireless connection)

Windows:
ipconfig /all

Linux:
$ more /var/lib/dhcp3/dhclient.eth0.leases
Where eth0 is your Ethernet interface.


Tuesday, June 16, 2009

Migrating a MySQL 3.23 database to 5.0

I'm trying to move a old server and database into the modern world and that involves migrating a database from MySQL 3.23 to MySQL 5.0. The official MySQL line is to migrate from one version to the next and not try skipping one - but that's not very practical in my situation and as it turns out is not strictly necessary.

I took some of my steps from this post by Paul Williams (for which I am very grateful!). I didn't need to do everything he did but did need to figure out a critical additional step. Note that your mileage may very much vary - my tables are pretty basic. Here are the steps that worked for me:

Migrating FROM MySQL 3.23.54 on Red Hat Linux 7.3 (Valhalla)
Migrating TO MySQL 5.0.75 on Ubuntu 9.04 (Jaunty)
All my tables were in MyISAM format - if they were not I would have to convert them - look at the older MySQL docs for info.

On the OLD system:
1: Dump out the tables
$ mysqldump --add-drop-table --add-locks --all
--quick --lock-tables mydatabase > mydatabase.sql
2: Convert from Latin1 character encoding to UTF8
$ iconv -f latin1 -t utf8 < mydatabase.sql > mydatabase_utf8.sql
3: Update auto_increment SQL definitions
Williams shows how to update these with this line
$ sed -e "/auto_increment/ s/DEFAULT '0'//" database_utf8.sql > mydatabase_utf8_filtered.sql
In my case this resulted in no changes to the SQL, so it was unnecessary but harmless.

4: Transfer the file to the new system

On the NEW system:

5: Create a short file of SQL header lines with this content:
set names utf8;
drop database if exists mydatabase;
create database mydatabase_inv character set utf8;
use chem_mydatabase;
Brian Williams suggests doing this rather than adding the lines to the top of your SQL file. I put mine into a file called 'sql_headers'.

6: Remove the leading comments on the SQL file
Williams did not include this step but for me it was essential. MySQL barfed on the first few comment lines of my SQL dump so I had to remove these. Basically I stripped everything down to the first real SQL statement. Other comments in the file were not a problem. Here is what I cut out - my hunch is that the long line of dashes is the culprit:
-- MySQL dump 8.22
--
-- Host: localhost Database: mydatabase
---------------------------------------------------------
-- Server version 3.23.54

--
-- Table structure for table 'table1'
--
7: Load the SQL into your database
cat sql_headers mydatabase_utf8.sql | mysql -u root -p
8: Done! (At least for me...)
Open up your mysql client and poke around to see if everything is there.

... now onto recreating an old Perl CGI app on the new system ... fingers crossed ...


Friday, June 12, 2009

Simple Example of using the YUI Tooltip Widget for Online Help

I've written an example HTML page that uses the Yahoo! YUI Tooltip Widget to popup a small informational window when your mouse hovers over a specific class of web page element. It works pretty well and is easy to set up.

You can download the example page from Github HERE.

The YUI JavaScript libraries and stylesheets are substantial, which is both good and bad. I haven't figured out how to modify the style of my tooltips yet - that'll take a bit of digging. But even this simple code is coming in very handy.

Thursday, June 11, 2009

Combing PDF pages using Preview in Mac OS X

Combining multiple PDF documents into one is remarkably easy in Mac OS X.

Open up Preview with a copy of your first document.

Open the Sidebar if not already open.

Drag additional PDF documents into the Sidebar.

Save the document.

Simple - I love it...

Tuesday, June 2, 2009

Resizing Browser windows to a Fixed Size

I'm trying my hand at some basic screencasts as a way to provide practical online help for an application. I'm using Jing to capture simple screen video clips and screencast.com to host them.

Video editing software and hosting sites prefer to use standard aspect ratios - either 4:3 or 16:9. If you record video at some other ratio and then convert it you risk losing detail in your video and for screencasts, where you want the text to be crisp, this can be a problem.

I'm trying to record my actions in a browser window and so to maximize my useful screen space while keeping in a preferred aspect ratio I want to do several things. (I'm using Firefox on a Mac - it also works in Safari - not tried it with IE on Windows)

1: Get rid of the Bookmarks toolbar (View -> Toolbars -> Bookmarks Toolbar)
2: Get rid of the Status Bar
3: Keep the Navigation toolbar so viewers can see the URLs I'm typing
4: (The Good Part!) Resize the browser window to a specific width and height.
In the URL entry field enter this line:
javascript:window.resizeTo(1024,768)

This just sets the size directly to one of the standard 4:3 aspect ratio sizes. Other choices might be (800, 600) or (640, 480). I need the larger size to capture all the text in my pages.

It is trivial to create a bookmarklet to do this. First bookmark an arbitrary page. Go into your Bookmarks collection and change the bookmark Title to something like 'Resize Browser' and then replace the URL with the magic command as shown above. Now when you go to that bookmark it will resize your browser.

A very simple solution, very cool...

Sending Email from Rails via Gmail

Sending email from a Rails application requires you to configure ActionMailer to use a SMTP mail server that is willing to handle your messages.

Using Google's Gmail is a good way to do this - reliable, free and likely to be around for a while. But going that route you need a slightly non-standard configuration and another gem as ActionMailer does not support the SSL/TLS (Transport Layer Security) that Gmail uses.

Various ways to do this show up in a web search but some of these seem a little outdated (Please add publication dates to your technical web posts!).

As of June 2009 with Rails 2.2.2, this post from Sam Pierson works for me.

1: sudo gem install tlsmail
2: Add the block he shows to the end of your environment.rb file (after the end of the Rails::Initializer.run block)

I use Gmail as part of Google Apps and in this case you want your gmail username to be your Google Apps email address (e.g. myname@mydomain.com and not just myname).


Friday, May 29, 2009

Configuring DNS servers on Ubuntu and Fedora

Just been setting up new DNS servers on my internal network. The primary was set up on an Ubuntu (Jackalope) system and the secondary on a Fedora Core 9. Both used Bind9 - the Ubuntu server had Bind 9.5.0-P2 and Fedora had 9.4.0.

On Ubuntu I followed the instructions in this Ubuntu guide and all went smoothly. I could test out the primary server and verify that it was working.

I figured the Fedora setup would be similar - but no - VERY different. For a start the Fedora configuration runs chroot around bind (I think that's the correct description) in order to make it more secure. So you have to put your files in /var/named/chroot/etc and /var/named/chroot/var/named (with symlinks from /etc/ in some cases).

The named.conf file format is a lot more involved under Fedora. You really want to use the samples in /usr/share/doc/bind-9.4.0/sample as a starting point. In particular, you need to put your zones in 'views' in the file.

Another problem I ran into was the need for a named.root file which contains the root servers for the Internet. You have to get this yourself and put it into /var/named/chroot/var/named/named.root.
# wget ftp://ftp.rs.internic.net/domain/named.root

And you need to have a file that tells DNS where this file is! (/var/named/chroot/etc/named.root.hints)

After doing all of that (and more) and trying to restart named it crapped out with these lines in /var/log/messages:
May 29 10:17:11 sequence named[12880]: starting BIND 9.4.0 -u named -t /var/named/chroot
May 29 10:17:11 sequence named[12880]: found 2 CPUs, using 2 worker threads
May 29 10:17:11 sequence named[12880]: loading configuration from '/etc/named.conf'
May 29 10:17:11 sequence named[12880]: /etc/named.rfc1912.zones:10: zone '.': already exists previous definition: /etc/nam
ed.root.hints:12
May 29 10:17:11 sequence named[12880]: listening on IPv4 interface lo, 127.0.0.1#53
May 29 10:17:11 sequence named[12880]: listening on IPv4 interface eth0, 192.168.2.25#53
May 29 10:17:11 sequence named[12880]: view.c:625: REQUIRE(view->hints == ((void *)0)) failed
May 29 10:17:11 sequence named[12880]: exiting (due to assertion failure)

Now what?! Thanks to this blog post I was able to comment out the '.' zone in the /var/named/chroot/etc/named.rfc1912.zones file, which is the duplication reported in the errors.

Finally I've got the secondary server up and running and getting my zones from the primary server. It just shouldn't be this difficult...


Wednesday, May 27, 2009

Allowing sftp access but not ssh

How you set up a UNIX account to allow remote access via sftp but not by ssh seems to be a common question judging by the number of Google hits. Unfortunately there are a plethora of suggested solutions, some of which seem quite complex. Here is what worked for me (on Ubuntu):

1: Create a regular user account and home directory for your user
# /usr/sbin/adduser jones

2: Add the user to the AllowedUsers in your /etc/ssh/sshd_config file
AllowUsers jones smith

3: Restart sshd
# /etc/init.d/sshd restart

4: Check that you can login remotely as that user - ssh and sftp should both work
% ssh jones@yourhost
% sftp jones@yourhost

5: Figure out where you sftp-server executable lives - look in /etc/ssh/sshd_config for this line:
Subsystem sftp /usr/lib/openssh/sftp-server

6: Edit /etc/passwd and replace the default shell for your user with this path
jones:x:1004:1004:Rob Jones,,,:/home/jones:/bin/bash
becomes:
jones:x:1004:1004:Rob Jones,,,:/home/jones:/usr/lib/openssh/sftp-server

7: Connecting with sftp should now work normally but if you try ssh you will get prompted for the password at which point nothing will happen.


Slicehost + Ubuntu + Mysqld + Rails Memory issues

Here are a couple of issues and/or fixes if you are running a Rails/Mysql application on a 256MB server - specifically I am (was) running a web site built using Radiant (a Rails/Mysql based CMS) on a 256MB slice at Slicehost.

The site is effectively static but this weekend Slicehost sent me an automated email telling me the slice was swapping heavily. Turns out that the default settings for Mysqld use the InnoDB engine and that chews up a lot of memory - well over 150MB.

Two solutions - turn off InnoDB or upgrade to a slice with more memory (for just under twice the cost).

To turn off InnoDB go into /etc/mysql/my.cnf, uncomment the line 'skip-innodb' and restart. That should drop your memory use by around 100MB.

But the settings for my existing Radiant app (running with Rails 2.3.2) appear to require InnoDB and Phusion Passenger fails to start the app with that setting.

Rather than mess with an app that has been fine, I decided to upgrade to a large slice. I dumped the database contents as a precaution but then just followed the resize steps from the Slicehost slice management page. Worked like a charm - everything came back up and works fine. Running 'free -m' or 'top' shows I've got memory to spare for now. It's costing me $38/month instead of $20, but I can stay with a default configuration for my database, etc. and that is worth quite a bit in itself.


Wednesday, May 20, 2009

s3sync, Ruby 1.8.7 and Ubuntu

s3sync is a great way to transfer files to and from Amazon S3.

Installing it onto an Ubuntu 8.10 (Linux 2.6.22-11-server) system with Ruby 1.8.7 I got the error 'LoadError: no such file to load -- openssl'.

Turns out you have to fetch the library manually:
# apt-get install libopenssl-ruby
That should solve the problem. Ubuntu is great but in the server installation you are expected to install ALL the packages you need - and you don't find out what you're missing until you try and run your code. Fedora goes the other way, installing more stuff than you probably need but at least you get all the core stuff. Neither of them gets it just right.

Another gotcha is that s3sync looks for your AWS keys in Env variables AWS_ACCESS_KEY and AWS_SECRET_ACCESS_KEY as opposed to AMAZON_ACCESS_KEY, etc.


Monday, May 18, 2009

Phusion Passenger and Static Sites

Phusion Passenger (aka ModRails) is a great way to run Rails apps from Apache. You add a couple of lines of Passenger configuration to your apache config file and create a VirtualHost for your application. Passenger does its thing behind the scenes and everything works fine.

But if you want to run a totally static web site as a VirtualHost on the same server as a Passenger-managed Rails app you need some way of telling Passenger what you are doing.

In your VirtualHost block for the Static site add a 'PassengerEnabled off' line:
<virtualhost>
PassengerEnabled off
ServerName mysite.com
DocumentRoot /home/jones/public_html/mysite.com/html
</virtualhost>
You will need to restart Apache as well.


Tuesday, May 12, 2009

Character Encodings and AWS SimpleDB

Just been bitten by an ISO-8859-1 character lurking in a string I was trying to load into a Amazon Web Services SimpleDB domain.

It is actually the same darn character that gave me issues in Ruby 1.9 the other week.

In this case the non-UTF8 character resulted in the request being sent to SimpleDB not matching the Signature that is computed from the request. Here is the error message that I kept getting with certain records I was trying to upload.
<?xml version="1.0"?>
<Response><Errors><Error>
<Code>SignatureDoesNotMatch</Code>
<Message>The request signature we calculated does not match the signature you provided.
Check your AWS Secret Access Key and signing method. Consult the service documentation for details.</Message>
</Error></Errors>
<RequestID>021ef5c0-b1fd-73ed-b376-bc292d9736cf</RequestID></Response>


So I spent a good few hours checking my AWS code for errors, trying a different AWS sdb library, trying the latest version of the Signature protocol, etc., etc. - all to no avail. Trying to pinpoint the problem I tried running the code again with a different set of input data and it was working fine. That told me it was data related and not code, per se. Looking more cloesely at the data with 'pp' I saw a non-ascii/non-utf-8 char code. Turns out SimpleDB has known issues when these appear in input queries.

For me, the fix was fairly simple. I'm 99% sure that all I need worry about are ISO-8859-1 codes in my input. So look for a non-ASCII code (> 127) in my input strings and if I find any I use iconv to convert to UTF-8, which SimpleDB can handle. Note that this is for Ruby 1.8 - It does not work in 1.9 - I'll post a fix for that in due course.
require 'iconv'

def convert(in_str)
ascii = 1
in_str.length.times do |i|
if in_str[i] > 127
ascii = 0
break
end
end
out_str = String.new(in_str)
if ascii == 0
in_encoding = 'iso-8859-1' # just a guess
out_encoding = 'utf-8'
out_str = Iconv.new(out_encoding, in_encoding).iconv(in_str)
end
out_str
end

[...]
input_hash.keys.each {|key| input_hash[key] = convert(input_hash[key]) }
[...]


Not pretty but it has got me back up and running.

Moral of this story: When arbitrary weird effects arise halfway through processing a large dataset, look closely at the data. Chances are the problem lies in there somewhere. Make sure you have some accurate log to help you pinpoint exactly where things went wrong.

Friday, April 24, 2009

Ruby 1.9 and String Encoding

Ruby 1.9 implements a load of Internationalization features, which is great, but I just ran into one unfortunate side effect of that.

I work with large text files representing DNA sequences, patents, etc. These are typically plain ASCII text and that is how I treat them. Under Ruby 1.8 everything seemed fine. But running the same code on a 2GB text file I got this error:

$ ./test.rb myfile
./test.rb:9:in `block in <main>': invalid byte sequence in US-ASCII (ArgumentError)
from ./test.rb:3:in `each_line'
from ./test.rb:3:in `<main>'

Here is code that gave rise to that:
#!/usr/bin/env ruby
open(ARGV[0], 'r').each_line do |line|
if line =~ />(\S+)/
puts line
end
end

Somewhere in the middle of the input file is a non-ASCII character and Ruby 1.9 won't take it. It turns out that 1.9 takes a much stricter line on interpreting text. Unless you tell it otherwise, it expects plain ASCII and anything else is an error. 1.8 just took what you gave it.

If you know you will be reading UTF-8 or ISO-8859-1 text then you can explicitly tell your script to handle it. There are several ways to do this but in this simple example you can change the 'r' in the open statement like this:
#!/usr/bin/env ruby
open(ARGV[0], 'r:utf-8').each_line do |line|

That's OK if you know the encoding, but in my work I see occasional non-ASCII characters, such as German umlauts, that have crept into public data files that I work with. I don't know what to expect and I don't want to clutter my code with rescue clauses to handle all possibilities.

The solution for my problem is to treat the text as binary by using the 'rb' modifier in the File.open statement. I can still process text data line by line but Ruby will swallow non-ASCII characters. So this version of the code takes the input data with no problems:
#!/usr/bin/env ruby
open(ARGV[0], 'rb').each_line do |line|
if line =~ />(\S+)/
puts line
end
end

My problem stemmed from two umlaut characters buried deep in the file. To figure out which lines were causing the problem I used this variant of the code to output bad lines.
#!/usr/bin/env ruby
open(ARGV[0], 'r').each_line do |line|
begin
if line =~ />(\S+)/
end
rescue
puts line
end
end

Look up the issue and you'll find plenty of debate on the merits or otherwise of this new feature in 1.9. It took me by surprise.


Syntax Highlighting in Blogger

I've figured out how to display blocks of code with nice syntax highlighting in these posts. There are all sorts of Javascript/CSS combos out there for doing this. I've chosen to go with google-code-prettify by Mike Samuel. Here are the steps needed to get it working in Blogger.

1: Add the script and css to your page layout
In your Blogger account go to 'Create Post' and then to the 'Layout' tab. You will see the page elements laid out. Click 'Edit Html' in the second row of tabs.

You're going to add two lines at the end of the HEAD section just before the </head> tag. The first one pulls in the CSS file from the repository and the second pulls in the Javascript code.
<link href='http://google-code-prettify.googlecode.com/svn/trunk/src/prettify.css'
rel='stylesheet' type='text/css'/>
<script src='http://google-code-prettify.googlecode.com/svn/trunk/src/prettify.js'
type='text/javascript'/>
</head>

If you wanted to avoid the calls out to that site you could just inline the content of those files.

Immediately below the </head> tag, change <body> to:
<body onload='prettyPrint()'>

This loads the JavaScript when the page loads. Save the template and go to 'Posting' -> 'Create' to create a test post.

2: Create a test post
Enter in some text into the new post and then enter a block of code. The prettifier can figure out most languages. For example:
['apple', 'orange', 'banana'].each do |fruit|
puts fruit
end

Go into the 'Edit Html' tab and put <pre> tags around your code. Add the special class as shown:
<pre class='prettyprint'>
['apple', 'orange', 'banana'].each do |fruit|
puts fruit
end
</pre>

Unfortunately syntax highlighting does not work in Preview mode or the Compose window. You just have to bite the bullet and publish your post to see what it looks like. And it should look something like the code blocks in this post.

To represent blocks of HTML code or anything with angle brackets you need to change the brackets to &lt; and &gt;, otherwise Blogger will try and treat them as html tags.

You can help the highlighter out by specifying the specific language to use by adding a second class to the pre tag such as:
<pre class="prettyprint lang-html">

You can check out the prettify JavaScript file to see which languages have specific classes like this. But it does a pretty good job even without that. You can use <pre> or <code> tags this way. The only difference is that the <code> version omits the surrounding box.

This is pretty slick. The approach ought to work with other syntax highlighters. If you try them let me know what you think in the comments. Now I need to go back in time and add this feature to all my old posts.


Installing Ruby 1.9 and gems on a machine with Ruby 1.8

I've run into problems in the past with multiple versions of Ruby on one machine, such as not finding gems, etc. Here are the steps I took to install Ruby 1.9.1 from source on a machine that already had Ruby 1.8.6 installed. Specifically this was on a Fedora 8 machine that had Ruby 1.8 installed from the ruby-devel rpm, which places it in /usr/lib.

To stir things up a bit more, some gems are not yet compatible with Ruby 1.9 (This post is written in April 2009). I'll address those later on. Hopefully those problems will go away over the next few months.

1: Capture a list of the Ruby gems that you have installed on your machine.
We'll use this later to reinstall the gems under 1.9.
# gem list --local --no-versions > gem_list

2: Fetch the Ruby 1.9 source
Download from ruby-lang.org into a staging directory. Pick their recommended version.
# wget ftp://ftp.ruby-lang.org/pub/ruby/1.9/ruby-1.9.1-p0.tar.gz

3: Compile and install
The defaults will install it in /usr/local/lib/ruby. If you already have an existing ruby installed there then you might want move it out of the way.
# ./configure
# make
# make install

4: Check the new version
Make sure that you have /usr/local/bin at the start of your PATH. This line in your .bashrc file will do that.
export PATH=/usr/local/bin:$PATH

Check the version of Ruby:
# which ruby
/usr/local/bin/ruby
# ruby -v
ruby 1.9.1p0 (2009-01-30 revision 21907) [i686-linux]

5: Download rubygems
Use wget rather than curl if you are doing this on the command line as wget handles the redirects that the rubyforge download links use. Choose the latest stable version.
wget http://rubyforge.org/frs/download.php/55066/rubygems-1.3.2.tgz

Unpack it, cd to the directory and install it.
# ruby setup.rb
# gem -v
1.3.2
# which gem
/usr/local/bin/gem

This creates /usr/local/lib/ruby/gems/.

6: Download and install a bunch of gems
Use the list of previously installed gems as your guide. I've written a script that will take care of most of the work for you: install_gems.rb. Comment out any gems in your list that you no longer need. More complex gems, such as Rails, will install other gems that they need, so don't worry if you comment out any gems that you don't recognize.

We will exclude the mysql gem from this automated process as it needs a special option. So comment that one out in your list for now.

Run the script (as root or sudo) and watch it do its thing:
# ./install_gems.rb gem_list
Installing actionmailer
Skipping actionpack
Installing actionwebservice
[...]

Don't worry when it skips certain gems. That just means that another gem has already installed them. You may see errors with some gems - don't freak out yet. These may well be related to Ruby 1.9. Capture the output in a file for easier troubleshooting. You can safely run install_gems.rb multiple times. Eventually it should skip over all the gems.

7: Manually install the mysql gem
If you want to use MySQL with Rails then install with an explicit path to mysql-config.
# which mysql_config
/usr/bin/mysql_config
# gem install mysql -- --with-mysql-config=/usr/bin/mysql_config

Note that you may get installation errors.

8: Ruby 1.9 and Gem Install Errors
By the time you try your installation all your gems may install just fine. But as of now (April 2009) several gems are not compatible with 1.9. The ones that gave me errors were:
mysql
mongrel
rubyprof
sqlite3-ruby
taps

Patching gem source code is a pain, so before you start down that path, decide if you really need these gems anymore. I've moved from mongrel to thin, so I can live without that one. I don't need to profile my apps right now so I can skip rubyprof. In fact the only one that I really need is mysql.

Time to poke around on the web and see how other people are dealing with the same problem. For Mysql you can edit the gem code or pull down a patched version or just give it a couple of weeks and see if the gem has been updated. It can be frustrating but there you go.

9: Clean up after yourself
Once you have verified that your new version of Ruby is working the way you expect then you might want to rename the old installation directories. I wouldn't delete anything but renaming them should ensure that you don't accidentally use the old version due an incorrect path, etc.

I hope this helps guide you through the Ruby install process and avoids the problems that can arise with two or more versions of Ruby on your machine.


Wednesday, April 22, 2009

Getting started with Sinatra and RestClient

Sinatra is a Ruby framework for developing web applications with RESTful interfaces. It looks like a great way to build specific applications where a full blown Rails app would be overkill.

I'm interested in it as a way to provide very focused, lightweight web services to support larger Rails applications. One example is fetching DNA sequences from a remote database, hosted on AWS EC2. Here is the entire Sinatra app (which calls a separate data lookup class).

#!/usr/bin/env ruby
require 'rubygems'
require 'sinatra'
require 'lib/seqlookup.rb'
get '/:db/:id' do
content_type('text/plain')
SeqLookup.fetch(params[:db], params[:id])
end

I ran into one wrinkle testing this out on my Mac. Following the 'hello world' example on their site did not work for me - never a good sign. It wants to fire up the Thin web server, which I don't have. It ought to then move on to try Mongrel and Webrick, but in my case it found some components of Thin and then barfed when it failed to find the rest. Including this line after the 'require' statements got it going.
set :server, %w[mongrel webrick]

But the better fix is to install Thin.
# sudo gem install thin

So Sinatra is a great way to create lightweight web services, but how do you consume them? Well you can use the URLs directly in curl or wget, or you can use ActiveResource from within Rails. Or you can use Sinatra's friend RestClient

Install the gem and then you can call your new web service with a script like this:
#!/usr/bin/env ruby
require 'rubygems'
require 'rest_client'
data = RestClient.get 'http://localhost:4567/genbank/NM_007294'
puts data

So far I'm impressed with these tools. I can reduce the complexity of my Rails apps by splitting off common services to small Sinatra apps. Sure, I'm adding complexity by having multiple web apps running and I risk failure in a supporting app causing failure in the larger app. But using a reliable hosting service like EC2 this is a risk I'm willing to take.

Wednesday, April 8, 2009

Radiant CMS

I just redesigned my web site and coded it up using Radiant CMS, a Rails-based Content Management System. I'm pleased with the result but the process was not totally pain-free. So here are some thoughts on the system that might be helpful to others.

Although Radiant is built with Rails, you are not coding up pages in Views like a regular application. Instead you use the Admin interface to your site and create pages using a web form. Those pages are stored in a database. You can code in regular HTML, Markdown, Textile, etc. Using a web browser is convenient but I found it tedious to edit compared to a real editor like Emacs or TextMate. In particular I missed the ability to quickly jump between pages and to search for text across all pages.

I made the mistake of starting with their example web site and morphing it to the one I wanted. Next time I would start with a blank site and build out my pages from scratch.

Radiant's documentation is bad - sorry, but it is. They really need getting started guides that explain how you really go about building a modest site - something more than the equivalent to 'hello world'. The system includes a range of Radiant tags which allow you to loop through, for example, news items, blog comments, etc. I used a few of these but not many. There are also a series of Radiant extensions for blog comments, slide shows, etc. The documentation on how to build these appears to be better than the core docs.

Pros:
- Easy to install the code, whether or not you know Rails
- Web interface is simple once you get the hang of it
- You can code in Markdown, etc., not just HTML
- Extensions and Tags can save a lot of work
- Using a web interface makes it easier to collaborate with others

Cons:
- Inability to edit pages directly is a pain if you are used to doing that
- The system expects you to know HTML and CSS, so it's not for complete novices
- Documentation is not good and needs more examples

Deploying the system to a hosted server (Slicehost) was fairly straightforward using Capistrano and Rake. But your server has to have MySQL and Rails installed. It could be useful to generate a version of the live site that consists of purely static pages.

Because it is Rails-based you can deploy Radiant sites to Heroku, which could be very useful for some users. I tried this and was almost successful. The deployment part was working after a few issues but it was screwing up pages due to a stupid CRLF (linefeed) translation problem. Heroku has the potential to make deployment very easy *but* it acts as a black box such that when something goes wrong you are out of luck. In my case Slicehost just seemed to be a better bet.

Thursday, March 19, 2009

Apple MiniDisplayPort to VGA Adapter Firmware Fix

In my last tech tip I talked about a problem connecting the late 2008 MacBook to a VGA projector and that you need to buy a direct Mini DisplayPort to VGA adapter.

It turns out that this adapter has a problem of its own in that it can cause flickering with certain displays - not what you want to find out when are starting a presentation to a client. Apple has issued a fix for this that updates the firmware in the adapter. Who knew that adapters had firmware? I just assumed it was just wires crossing over in the right way!?

But there's a problem... actually several...

1: The update is not included in the regular Apple Software Update process unless you use that adapter and a live monitor as your main machine. If you use a DVI monitor like me then you'll never know about it unless you read an article like this. Fail.

2: The instructions for installing the fix require that you not only have the adapter plugged into your Mac but you have to have a live VGA monitor plugged into it. What are you supposed to do if you don't have one? Ask you client if they wouldn't mind waiting a few minutes while you plug into their projector and do a firmware update? Double Fail.

3: Those instructions raise the possibility that your VGA monitor may not work with this adapter. Again, I'm only going to find this out in a conference room at one of my clients. Fail.

I'm sure there are important technical reasons for all this but this not what I expect from Apple. It's an adapter - it should just work.

Saturday, February 28, 2009

DVI connector problem with 2008 Mac PowerBook and Video Projectors

I've got a 2008 metal Apple MacBook which has the new mini DisplayPort that allows you to connect an external monitor. Apple provide a mini-DisplayPort to DVI adapter and I use that all the time with my Viewsonic external monitor ... not a problem.

Last week I wanted to show a client some work I had done for them and so took the Mac, the mini-DisplayPort adapter and a DVI to VGA adapter with me. BIG PROBLEM... I needed the DVI-VGA adapter to connect to the client's projector. But when I tried to plug the Apple DVI-VGA adapter into the Apple DVI-DisplayPort adapter it wouldn't fit.

The DVI-VGA adapter has four extra pins on either side of the flat blade of the DVI plug. The DVI-DisplayPort adapter has no matching holes!!! What the!?!

It turns out there are more than one DVI connector. The new DVI-DisplayPort used the DVI-D connector - 'DVI Digital', also called True Digitial. The other adapter uses DVI-I - 'DVI Integrated Digital and Analog (and specifically the Single Link version thereof). You can plug DVI-D or DVI-I onto a DVI-I socket ... but not the other way round...

You get more of the gory details here: http://www.directron.com/dviguide.html - scroll down for images of the connectors.

So if you want to use your MacBook with a VGA projector, you need to get a suitable adapter.

You might want to go with a direct miniDisplayPort to VGA. Apple sell one for $29 (Mini DisplayPort to VGA Adapter) This will do the job but it is really overpriced considering what it is.

You could also get a DVI-D to VGA adapter. Apple have one of those but they don't say if it is DVI-D or DVI-I! What use is that? Your best bet is to look on Amazon and be specific about DVI-D. You want Male DVI-D and Female VGA. There are plenty of options.

One last thing - don't confuse mini DVI with mini DisplayPort - two different things!

In my meeting I was lucky - it wan an informal meeting and I was able to copy my files to a Win PC that connected to the projector. But if that had been an important presentation I would have looked like a fool... not good. Get an adapter TODAY.

Archive of Tips