If, like me, you're not that familiar with video technology and terminology, the process can be confusing - which compression settings? how many frames per second? etc.
With Mac OS X 10.5 (Leopard) you could do simple video editing in Quicktime Player if you upgraded to the Pro version. Ironically in Snow Leopard you can trim video clips in regular Quicktime Player, but without the flexibility and controls of the previous version - and there is no Pro version... so Snow Leopard is a step backwards. The version of iMovie in iLife 09 is great when it comes to editing clips, but is confusing in terms of exporting the finished movie.
Here are the steps that I use to get from my screen to a finished screencast on a hosting service that I can embed in a web page. Its not perfect, but it works for me...
Here are the main steps:
1. Set browser to 1024 x
2. Record screen activity and audio in iShowU
3. Load the movie into iMovie
4. Cut and splice together clips in iMovie
5. Export as MPEG-4 movie (.mp4)
6. Load into QuickTime Player and re-export as a streaming MPEG-4 file (.m4v)
7. Upload to screencast.com
I'm not going into all the details but here are the settings that work for me in each of these components:
1. Set my browser to a defined size (1024 x 768)
Create a bookmarklet with this string: 'javascript:window.resizeTo(1024,768)'
2. Record screen activity and audio in iShowU
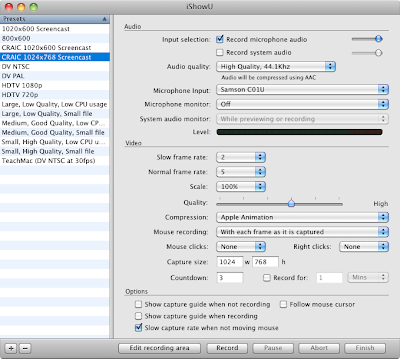
Here are my settings - 'Apple Animation' for compression, capture size and frame rate are the most important.

3. Import in to iMovie09
Go to File -> Import... -> Movies... -> Optimize video: Full - Original Size
Not sure if you need to optimize video - not tried it unchecked. Importing takes a while, probably due to whatever 'optimize' involves.
4. Cut clips from your raw video and add to the new movie.
I'm not going into detail with this - look at the iMovie Docs. I find iMovie to be pretty easy to use once you get the hang of it. I would really like to see real time codes for the start and stop of clips and be able to set those directly, but I guess that is what Final Cut Pro is for.
5. Export as MPEG-4 movie (.mp4)
Here is where it can get tricky... pick the wrong settings and the output looks bad, or it takes *hours* to export, or the output file is huge... or ALL of the above!
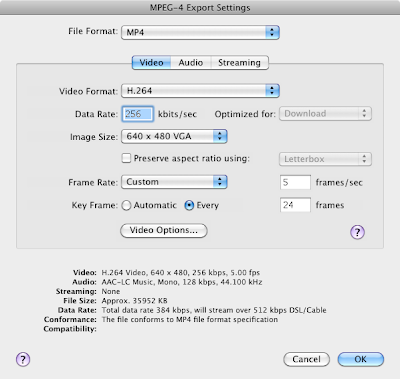
I don't have this totally figured out but here is what works for me. Note that I'm going from 1024x768 raw footage to 640x480 output.

The important settings are:
- MP4 file format
- H.264 video format
- image size (640 x 480 VGA)
- IMPORTANT - frame rate - Custom - 5 frames per second (this is what you recorded the footage at)
- don't worry about the data rate and don't worry about the Streaming tab
- set the audio to mono
In my hands a 12 minute screencast is exported in a few minutes and yields a file around 25 MB.
6. Load into QuickTime Player and re-export as a streaming MPEG-4 file (.m4v)
Without this step, your users have to wait to download the entire file before they can start viewing. You must be able to do this within iMovie but I haven't figured it out yet.
First of all, view your .mp4 movie in Quicktime Player to make sure it works the way you want.
Then go File -> Save for Web... and Export versions for Computer (and iPhone if you want) - then 'Save'.
This will create a folder with several files - all I care about is the .m4v, but view the .html file for links and more info. Open the .m4v file in Quicktime Player to check that it is the same as the .mp4. Compare the files sizes - the .m4v may actually be larger than the .mp4.
7. Upload to screencast.com
I use screencast.com to host my screencasts. You can get a free account, which has been fine for my needs or pay a modest amount and get a much higher bandwidth limit.
It works out pretty well for me, but I do run into odd issues from Firefox on the Mac - things freezing in the admin interface - seems fine from Safari.
Once uploaded to screencast, look under the 'share' icon to get the code needed to embed a flash player in your own web page and try viewing the video. Having converted it to 'streaming' in the previous step you should see the video start pretty much right away while the rest of the data downloads.
If you skip this step then you will be stuck with a black screen for as long as it takes to download - no progress indicator! Not sure if this is a Flash problem or a Screencast one, either way it is not good.
BONUS - Title slides in iMovie
I make title slides in OmniGraffle that are the size of a frame (1024 x 768) and save these as PNG files. You can add these to you iMovie project by dragging and dropping and then changing the length of time they should be visible for.
But a big Gotcha for me, is that by default iMovie will try and apply a silly 'Ken Burns' transition to the slide making it grow (or shrink) slightly. This makes the text look rubbish in my examples.
Click on that 'clip' and use the small 'cog wheel' pull down menu to go to 'Cropping, Ken Burns and Rotation'. Now in the video preview panel (top right), click on the 'Fit' button to make the title slide fit the frame exactly - then click 'Done'
Here is an example of my screencasts embedded in a web page: Creating a New Account in SQIP
Good Luck


1 comment:
There is a reason why I bought a Mac, it was not to be one of the cool kids that wanted the best of the best. No it was because of the music production I do on it. Hours and hours sitting in front of my Mac copying, pasting, moving, deleting, hour after hour just beating on my Mac in a endless assault to get my work done. That is the key part, my work. I work from home, it is great, but even if it is from home it is still work and it still needs to get done. So my Mac, I have it because it is fast, gets the job done and comes back for more.
But what happens when it doesn't want to do those things anymore?
I move around massive amounts of information and yes even on the almighty Mac this can cause a problem after a while. Things fragment, programs get corrupted issues come up. My light speed Mac slows down to a crawl and all of the sudden I simply cannot get any work done. Because I work from home there is no IT guy to call and ask to come fix it. No instead I have to figure out what is wrong. I am lucky, I did, but not after trying everything under the sun first and wasting countless hours looking for one program that can do what I needed instead of ten programs. One program to lead them all….okay that was a lame Lord of the rings reference, but that program was/is Detox My Mac. A simple to use program that did not just fix my issues, it put my Mac on overdrive again. A few clicks and my Mac was clean and ready to rock and roll again.
Read more here:- http://detox-my-mac.com?duhhf9265hskfhf98346
Post a Comment