A collection of computer systems and programming tips that you may find useful.
 
Brought to you by Craic Computing LLC, a bioinformatics consulting company.

Monday, February 15, 2010

Rails check_box_tag and Rails 2.3.x

Basic HTML checkboxes have an inherent problem in that there is no explicit value passed to the server when the box is unchecked.

Under Rails 2.2.2 (and thereabouts) you could circumvent this limitation with an ugly hack.

If you wanted to use a check_box_tag helper in a form you had to use a had to follow it with a hidden_field_tag that contained the unchecked value. For instance:

<%= check_box_tag :approval_check_box, '1' %>
<%= hidden_field_tag :approval_check_box, '0' %>

If the check box was not checked then value in the hidden field would be passed. Ugly, but it worked fine.

But at some point in the move to Rails 2.3.x this hack was turned on its head and the construct show above will now always pass the unchecked value to the server.

The fix is simple - just reverse the two lines:
<%= hidden_field_tag :approval_check_box, '0' %>
<%= check_box_tag :approval_check_box, '1' %>

The real solution if to use a check_box helper where you can explicitly specify the unchecked value, rather than a check_box_tag.

I stumbled across this while updating an older app from Rails 2.2.2 to 2.3.5. It took a while to narrow the issue down to this problem.


Wednesday, February 10, 2010

Rails, Time Zones and the current local time

Since version 2.1 it has been easy to handle user-specific time zones in Rails. Take a look at Railscast #106 for details.

Rails takes care of converting times in your models back and forth from local timezones and UTC in the database and it works great.

But I wanted to put the current local time at the bottom of each page, so that if they printed out the page they had a time stamp right there.

My server is set up to with UTC as its time zone and Rails picks up on that, such that if I simply print out Time.now I get it in UTC, regardless of having set Time.zone to 'US Pacific...', which is not what I want.

Because I'm not accessing the time from a database record, it doesn't apply the user specific conversion.

The way to do this is to add 'in_time_zone' which forces Time to use the current Time.zone.

Bottom Line:

To display the current time in a user's local time zone, use Time.now.in_time_zone


Wednesday, February 3, 2010

Rails, searchlogic and will_paginate

The searchlogic gem, for active record searching, integrates well with will_paginate, for pagination of the results in index pages, and it comes with simple helpers for setting up sortable column headers.

But I had trouble setting the default sort order for the results if not filtering had taken place or if no column header had been clicked. What I found on the web was a little confusing. Here's how it works (as of Feb 2010).

The model has a list of companies and I want the default search order to use their names.

In your controller:

@search = Company.search(params[:search])
@search.order ||= :ascend_by_name
@companies = @search.all.paginate :page => params[:page], :per_page => 20

Note that you set the order in @search and leave out the :order parameter to paginate.


Simple, elegant, love it...


Tuesday, February 2, 2010

Rails, Searchlogic and Dates

I've been using the searchlogic gem from Ben Johnson and its a great way to build complex search forms for your models. Railscast #176 is a great introduction to the topic by Ryan Bates (You can't go wrong with Railscasts!).

One topic missing from the documentation is how searchlogic handles Dates, but the functionality is in there. Here is how you use it.

You treat a date effectively as a number and you can use 'equals', 'gte', 'lte', etc. as comparison operators.

Assuming you have a column named 'date', of type 'date' in your model, you can put something like this in your form:

<%= f.label :date, "Date" %>
<%= f.text_field :date_gte, :size => 12 %> -
<%= f.text_field :date_lte, :size => 12 %>

You can then enter dates into one or both of the fields to retrieve records that fall into that date range.

But what date format should you use? This is where it gets clever. It wants to use YYYY-MM-DD format but if you enter MM/DD/YYYY it accepts is and converts it for you. Brilliant! It even takes text like 'Dec 1 2009' and converts that. Interestingly it won't accept invalid dates like '2009-11-31' and just gives you back the form with the field cleared out.

With a column of type 'Datetime' it converts your entries as well but this time it converts '2010-01-01' into 'Fri Jan 01 00:00:00 -0800 2010'. I'm sure it does something similar with columns of type 'Time'.

Undoubtedly the code is leveraging the Ruby time and date libraries to make the conversions, which can be lifesavers. Incorporating the functionality into searchlogic makes your forms much more tolerant of user inputs and it does so in a totally unobtrusive way.


Thursday, December 17, 2009

Creating a Mail Merge from Contacts in Highrise

I've started using Highrise from 37 Signals to manage sales prospects for the SQIP Patent Sequence Database. My requirements for a CRM system are pretty basic. Highrise fits the bill for now, but it's OK - not great.

One glaring problem for me is that I want to create a file of all contacts and their addresses for a physical mailing. In Highrise I record the address for each Company and then just record the company for each Person. When you dump your contacts out as a CSV file 'Person' records do not inherit the address of the linked Company... really, it doesn't...

So I wrote a Ruby script to create what I want from the CSV file. You can find that here: http://gist.github.com/258950

1. Dump your contacts from Highrise
2. Run the script on that file
$ ./merge_highrise_contacts.rb contacts.csv > mail_merge.csv
3. Load the output file into Excel or Numbers (09)
4. Save as a Worksheet
5. Follow the regular Mail Merge instructions for MS Word/Excel or Apple Pages/Numbers

You need the '09 version of Pages/Numbers to do a proper Mail Merge. I prefer Numbers to Excel for this as it handles international characters properly, which I need.

In Numbers you need to designate the Header line as such by selecting 'Convert to Header Row' from the pull down menu on the row 1 label.

I'm all for the 37 Signals 'Keep things simple' approach but there are features that are just too widely used to ignore. Not being able to build a mailing list is one. Not having Prefix and Suffix for Person records is another.

Many of my contacts have doctorates and I want to record the prefix 'Dr.' for those that do. The only way I can do that in Highrise is to include it in the First Name. This is a pain.

Wednesday, December 16, 2009

Screencasting on Mac OS X 10.6 Snow Leopard

I've been making several screencasts as tutorials for our SQIP Patent Sequence Database service.

If, like me, you're not that familiar with video technology and terminology, the process can be confusing - which compression settings? how many frames per second? etc.

With Mac OS X 10.5 (Leopard) you could do simple video editing in Quicktime Player if you upgraded to the Pro version. Ironically in Snow Leopard you can trim video clips in regular Quicktime Player, but without the flexibility and controls of the previous version - and there is no Pro version... so Snow Leopard is a step backwards. The version of iMovie in iLife 09 is great when it comes to editing clips, but is confusing in terms of exporting the finished movie.

Here are the steps that I use to get from my screen to a finished screencast on a hosting service that I can embed in a web page. Its not perfect, but it works for me...

Here are the main steps:
1. Set browser to 1024 x
2. Record screen activity and audio in iShowU
3. Load the movie into iMovie
4. Cut and splice together clips in iMovie
5. Export as MPEG-4 movie (.mp4)
6. Load into QuickTime Player and re-export as a streaming MPEG-4 file (.m4v)
7. Upload to screencast.com

I'm not going into all the details but here are the settings that work for me in each of these components:

1. Set my browser to a defined size (1024 x 768)

Create a bookmarklet with this string: 'javascript:window.resizeTo(1024,768)'

2. Record screen activity and audio in iShowU

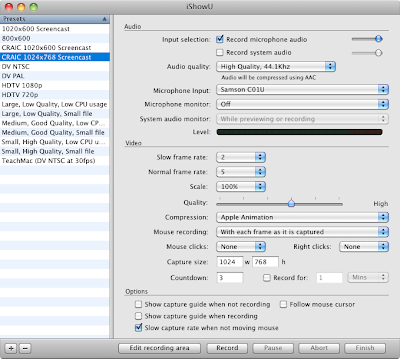
Here are my settings - 'Apple Animation' for compression, capture size and frame rate are the most important.

3. Import in to iMovie09

Go to File -> Import... -> Movies... -> Optimize video: Full - Original Size

Not sure if you need to optimize video - not tried it unchecked. Importing takes a while, probably due to whatever 'optimize' involves.

4. Cut clips from your raw video and add to the new movie.

I'm not going into detail with this - look at the iMovie Docs. I find iMovie to be pretty easy to use once you get the hang of it. I would really like to see real time codes for the start and stop of clips and be able to set those directly, but I guess that is what Final Cut Pro is for.

5. Export as MPEG-4 movie (.mp4)

Here is where it can get tricky... pick the wrong settings and the output looks bad, or it takes *hours* to export, or the output file is huge... or ALL of the above!

I don't have this totally figured out but here is what works for me. Note that I'm going from 1024x768 raw footage to 640x480 output.
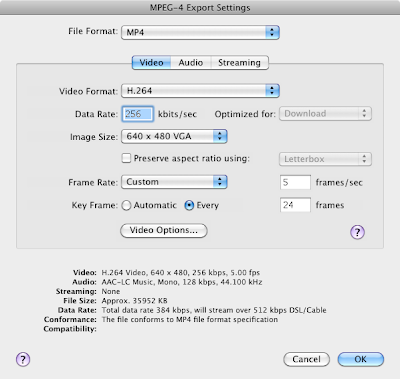

The important settings are:
- MP4 file format
- H.264 video format
- image size (640 x 480 VGA)
- IMPORTANT - frame rate - Custom - 5 frames per second (this is what you recorded the footage at)
- don't worry about the data rate and don't worry about the Streaming tab
- set the audio to mono

In my hands a 12 minute screencast is exported in a few minutes and yields a file around 25 MB.

6. Load into QuickTime Player and re-export as a streaming MPEG-4 file (.m4v)

Without this step, your users have to wait to download the entire file before they can start viewing. You must be able to do this within iMovie but I haven't figured it out yet.

First of all, view your .mp4 movie in Quicktime Player to make sure it works the way you want.

Then go File -> Save for Web... and Export versions for Computer (and iPhone if you want) - then 'Save'.

This will create a folder with several files - all I care about is the .m4v, but view the .html file for links and more info. Open the .m4v file in Quicktime Player to check that it is the same as the .mp4. Compare the files sizes - the .m4v may actually be larger than the .mp4.

7. Upload to screencast.com

I use screencast.com to host my screencasts. You can get a free account, which has been fine for my needs or pay a modest amount and get a much higher bandwidth limit.

It works out pretty well for me, but I do run into odd issues from Firefox on the Mac - things freezing in the admin interface - seems fine from Safari.

Once uploaded to screencast, look under the 'share' icon to get the code needed to embed a flash player in your own web page and try viewing the video. Having converted it to 'streaming' in the previous step you should see the video start pretty much right away while the rest of the data downloads.

If you skip this step then you will be stuck with a black screen for as long as it takes to download - no progress indicator! Not sure if this is a Flash problem or a Screencast one, either way it is not good.

BONUS - Title slides in iMovie

I make title slides in OmniGraffle that are the size of a frame (1024 x 768) and save these as PNG files. You can add these to you iMovie project by dragging and dropping and then changing the length of time they should be visible for.

But a big Gotcha for me, is that by default iMovie will try and apply a silly 'Ken Burns' transition to the slide making it grow (or shrink) slightly. This makes the text look rubbish in my examples.

Click on that 'clip' and use the small 'cog wheel' pull down menu to go to 'Cropping, Ken Burns and Rotation'. Now in the video preview panel (top right), click on the 'Fit' button to make the title slide fit the frame exactly - then click 'Done'

Here is an example of my screencasts embedded in a web page: Creating a New Account in SQIP

Good Luck


Announcing the Launch of the SQIP Patent Sequence Database

Craic is pleased to announce the launch of a web service that we've been working on for the past couple of years.

SQIP (pronounced 'skip') is a database of DNA, RNA and Protein sequences derived from issued patents and published patent applications, along with a sophisticated interface that allows users to load their own sequences, run searches against the database, evaluate matches and then view the patents associated with those matches.

It is targeted not only at biotech patent agents and attorneys, but also at business development and research staff in biotech companies.

SQIP has been built on many of the technologies that this blog has touched on. It has been a lot of work but by leveraging best-in-class software we've been able to build something that we think will change patent sequence searching.

You can sign up for a free account at http://sqipdb.com. You can explore all the features of SQIP, including searches with pre-loaded sequences, at no charge. You simply pay for searches with your own searches - no annual commitment, no per-user charges, no surprises.

Take a look at SQIP.

Archive of Tips